Editing Repair Statuses
To open the repair statuses setup area, first close all
windows within the main program shell and then select Setup  Repair Statuses from the main
menu.
Repair Statuses from the main
menu.
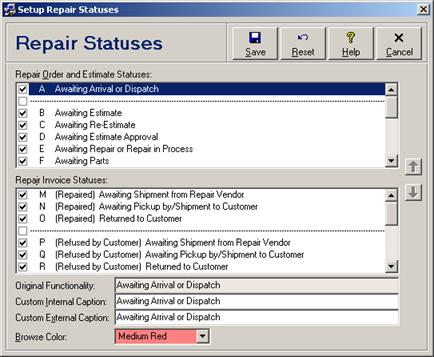
Enter repair status settings and click the Save button to save changes. Click the Reset button to reset all repair statuses and captions back to their original program defaults (see below). Click the Close/Cancel button or press the Esc key to quit without saving changes. Each entry field is discussed in the following table.
Repair Status Entry Fields
|
Field |
Description |
|
Repair Order and Repair Estimate Statuses |
Navigate to the desired repair status and click the checkbox, or press the Space key, to toggle whether that repair status is activated or deactivated. Some repair statuses are integral to the operating of the program and therefore may not be deactivated (see Repair Order and Repair Estimate Statuses). As each repair status is activated or deactivated, all active repair statuses are automatically reassigned a sequential letter of the alphabet for quick reference. |
|
Repair Invoice Statuses |
Navigate to the desired repair status and click the checkbox, or press the Space key, to toggle whether that repair status is activated or deactivated. Some repair statuses are integral to the operating of the program and therefore may not be deactivated (see Repair Invoice Statuses). As each repair status is activated or deactivated, all active repair statuses are automatically reassigned a sequential letter of the alphabet for quick reference. |
|
Original Functionality |
This field describes the original core functionality of the selected repair status and may not be edited. |
|
Custom Internal Caption |
Enter the caption to be displayed throughout the program entry screens and on reports for internal use whenever the selected repair status is referenced (e.g. if technicians do not do on-site repairs or servicing then the first repair status might be renamed from “Awaiting Arrival or Dispatch” to simply “Awaiting Arrival”). The default caption is the same name as the original core functionality of the repair status. |
|
Custom External Caption |
Enter the repair status caption to be displayed on repair status listing reports and notices that are sent directly to customers or displayed on-line (see Repair Status Listing, Repair Status Listing Reports, and Repair Status Web Site). For example, if you do not want customers to know that a repair has been subcontracted to a third-party repair vendor then the repair status “(Subcontracted) Awaiting Estimate” might be renamed to simply “Awaiting Estimate”. The default caption is the same name as original core functionality of the repair status, except for subcontracted statuses which do not include the “(Subcontracted)” prefix. |
|
Browse Color |
Select the desired color shading to be displayed in the “Status” column of the repair orders browse window for repair orders that are set to the selected repair status (see Browsing Repair Orders). |
Custom Repair Statuses
Repair statuses can be divided into sub-steps that all have the same core functionality as the original status by configuring one or more of the 24 custom repair statuses (12 custom statuses for each of the two main repair status categories). The following table lists some typical examples of how the original core repair statuses might be divided into sub-steps.
Examples of Repair Status Sub-steps
|
Original Repair Status |
Repair Status Sub-steps |
|
Awaiting Arrival or Dispatch |
Awaiting Arrival |
|
Awaiting Repair or Repair in Process |
Awaiting Repair |
|
Awaiting Repair or Repair in Process |
Awaiting Repair |
|
Awaiting Parts |
Awaiting Parts Order |
|
(Repaired) Awaiting Pickup by/Shipment to Customer |
(Repaired) Awaiting Pickup by Customer |
|
Abandoned |
Abandoned for parts |
To configure a custom repair status, navigate to the
desired custom repair status, activate that repair status (see above), and click
the  and
and  buttons to move the selected repair status
up or down. Position the custom repair status immediately below the desired
original repair status (or one of its already assigned sub-steps) and the custom
repair status will automatically inherit the functionality of that original
repair status above it. (Moving a custom repair status immediately above the
first original repair status in each of the two main repair status category
areas will cause the custom to repair status to inherit the functionality of
that first original repair status below it.) Once the custom repair statuses
have been positioned and activated, rename the internal and external captions of
both the original repair status and/or the corresponding sub-steps.
buttons to move the selected repair status
up or down. Position the custom repair status immediately below the desired
original repair status (or one of its already assigned sub-steps) and the custom
repair status will automatically inherit the functionality of that original
repair status above it. (Moving a custom repair status immediately above the
first original repair status in each of the two main repair status category
areas will cause the custom to repair status to inherit the functionality of
that first original repair status below it.) Once the custom repair statuses
have been positioned and activated, rename the internal and external captions of
both the original repair status and/or the corresponding sub-steps.
(See also Custom Captions.)
 Reporting on Repair Statuses