Editing Business Locations
The entry fields available while viewing or editing business location records (see Browsing Business Locations) are discussed in the following table.
Business Location Main Area

Business Locations Main Area Entry Fields
|
Field |
Description |
|
Company Name |
Your company name is not editable, but is automatically assigned based on the company name encoded with the installed license. (see Installing a New or Updated License). If no license file has yet been installed then the company name is set to “Unlicensed Evaluation Edition” by default. Your company name prints at the top of all reports. |
|
Location ID |
Enter a unique code to identify each business location, up to 7 characters. The default is a three-digit number sequentially assigned as each business location is added. It is a required field and may not be empty. |
Business Location - Address Tab
The contact information for a user’s assigned business location is optionally printed in the header of each form (see Form Options).
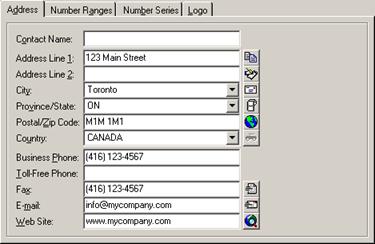
See Communication Tools for information on using communication tools with the business location contact information.
Business Locations Address Tab Entry Fields
|
Field |
Description |
|
Contact Name |
Enter a contact name for this business location, up to 32 characters. |
|
Address Line 1 |
Enter the first street address line for this business location, up to 32 characters. |
|
Address Line 2 |
Enter the second street address line for this business location, up to 32 characters. |
|
City |
Enter or select the city in which this business location is located, up to 32 characters. Which cities appear in the list as well as whether or not the cities appear in all-capitals is dependant on your geographic default settings (see the individual module options below the “Geographic Selection Lists” branch under General Module Options). The province or state and country corresponding to the city will be entered automatically. |
|
Province/State |
Enter or select the province or state in which this business location is located, up to 32 characters. Which provinces and states appear in the list as well as whether or not the provinces and states appear in all-capitals is dependant on your geographic default settings (see the individual module options below the “Geographic Selection Lists” branch under General Module Options). The country corresponding to the entered province or state will be entered automatically. |
|
Postal/Zip Code |
Enter the postal code or zip code for this business location, up to 10 characters. - forced to uppercase |
|
Country |
Enter or select the country in which this business location is located, up to 32 characters. Whether or not the countries appear in all-capitals is dependant on your geographic default settings (see module option “Capitalize Geographic Selection Lists” under General Module Options). The country of a user’s assigned business location will automatically be entered as the default for new or miscellaneous customers and vendors (i.e. customer or vendor account 0000000). Also, wherever formatted mailing addresses are displayed or printed throughout the system, the country portion of the address will not be included if it is the same as the country of the user’s assigned business location. If the country of a user’s assigned business location is USA, U.S.A., United States, or The United States of America, then certain Americanized spellings will apply for that user (see Americanized Spelling). |
|
Business Phone |
Enter the business phone number for this business location, up to 23 characters. |
|
Toll-Free Phone |
Enter the toll-free phone number for this business location, up to 23 characters. |
|
Fax |
Enter the fax number for this business location, up to 23 characters. |
|
|
Enter the e-mail address for this business location, up to 32 characters, or 50 characters for licensed users of version 2.1 and higher. |
|
Web Site |
Enter the Internet web site address for this business location, up to 50 characters. |
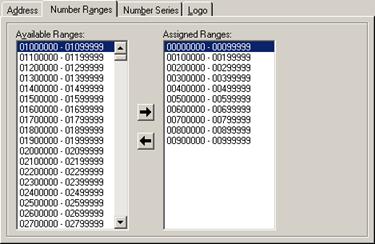
Business Location - Number Ranges Tab
Each business location must be assigned a range (or ranges) of numbers in order to uniquely identify which records are created by each location. Many reports allow for analysis based on either an individual location, by filtering to records that fall within the number range(s) for that location, or globally based on all records.
A number range is assigned as a three-digit prefix. For example, the prefix 123 would represent all seven-digit customer or vendor account numbers from 1230000 to 1239999, and all eight-digit repair order, sales invoice, credit note, or purchase order numbers from 12300000 to 12399999. If you prefer to have only one or two digits represent a business location then assign all number ranges beginning with the desired prefix to a particular business location. For example, to assign the prefix 12 to a business location, then assign all number ranges from 120 through 129 to that business location. Multiple number ranges assigned to a single business location do not need to be sequential.
Business Locations Number Ranges Tab Entry Fields
|
Field |
Description |
|
Available Ranges |
Select an available number range and click the |
|
Assigned Ranges |
Select an assigned number range and click the |
 button or press the Enter key
to assign that number range to this business location.
button or press the Enter key
to assign that number range to this business location. button or press the Enter key
to remove that number range assignment from his business location. At
least one number range must always be assigned to a business
location.
button or press the Enter key
to remove that number range assignment from his business location. At
least one number range must always be assigned to a business
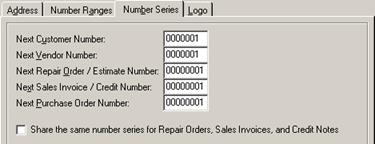
location.Business Location - Number Series Tab
Unique seven-digit numbers uniquely identify each customer and vendor account, and unique eight-digit numbers uniquely identify repair orders, credit notes, sales invoices, and purchase orders. By default, record numbers are automatically assigned the next available incremental record number. They may also be assigned manually (see Module Options).
On the number series tab, enter the numbers to be used for the next sequential number in each number series. All number series are automatically padded to seven digits with leading zeros. If a duplicate record number is detected when trying to assign the next sequential number from any series then the number is repeatedly incremented by one until a unique number can be assigned. If a duplicate record number is detected when the user has manually assigned a record number then the user will be prompted to select a different unique record number.
When records are archived to an archive database, all unique record numbers that were archived become available again for use in the current database (see Archiving an Access Database).
Business Locations Number Series Tab Entry Fields
|
Field |
Description |
|
Next Customer Number |
Enter the sequential number to be assigned to the next new customer account. |
|
Next Vendor Number |
Enter the sequential number to be assigned to the next new vendor account. |
|
Next Repair Order / Estimate Number |
Enter the sequential number to be assigned to the next new repair order or estimate. |
|
Next Sales Invoice / Credit Number |
Enter the sequential number to be assigned to the next new sales invoice or credit note. |
|
Next Purchase Order Number |
Enter the sequential number to be assigned to the next new purchase order or purchase return. |
|
Share the same number series for Repair Orders, Sales Invoices, and Credit Notes |
Check this box if the same number series should be used for repair orders, sales invoices, and credit notes. Uncheck this box if repair orders should have a separate number series from repair orders. The system default is to share the number series. If the box is checked and there are already repair orders and sales invoices or credit notes with the same record number then there is no adjustment of previous records. |
Business Location - Logo Tab
The graphical business logo is optionally printed in the header of each form (see Letterhead and Business Logos on Forms). It may also be included on automatically generated web pages and services associated with the At Your Service – Internet Utility (see Internet Utility Overview).
To print your company’s graphical business logo on forms, set the Print Business Logo Size option for each form (see Form Options).
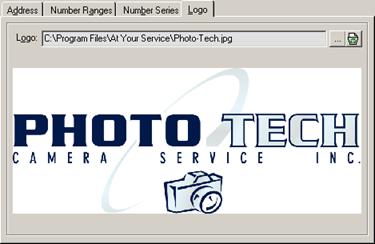
Click the … button to browse for a .JPG picture file.
Picture files must be in RGB or Grayscale color mode (i.e. CMYK and Lab color mode images may not be used). Further, it is recommended that picture files used for printing have a resolution of at least 300 dots-per-inch.
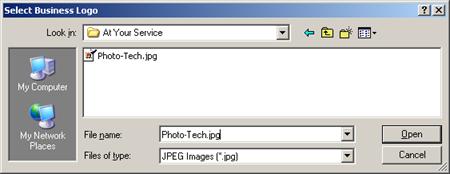
Navigate to the folder where the picture file you want to open is located and either double-click on the file name, single-click on the file name and then click the Open button, or type the file name in the File name field and then click the Open button. The picture file will be scaled and displayed. Click the Cancel button or press the Esc key to cancel without opening a picture file.
Click the  button
to clear the selected graphical business logo.
button
to clear the selected graphical business logo.
The configuration of a graphical business logo is available only for licensed users of version 2.5 and higher.
 Reporting on Business
Locations
Reporting on Business
Locations