QuickBooks Export Options
Before exporting any data to QuickBooks, you must first configure which country edition of QuickBooks you are using, and which QuickBooks items, classes, templates, etc. correspond to their equivalents within At Your Service.
To open the QuickBooks Options module, first close all
windows within the main program shell and then select Export  To QuickBooks Options from the main menu.
Step 1a: Configure the QuickBooks Company File
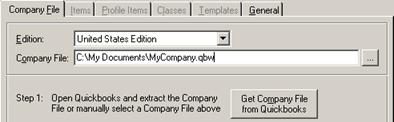
From the Company File tab, select whether you are using the Canadian, U.S., or U.K. edition of QuickBooks.
If the company file is already open, then the simplest way to specify which QuickBooks company file you are using is to press the Get Company File from QuickBooks button. Optionally, you may choose to type in the complete path and file name of the company file, or click the … button to browse for the file.
Step 1b: Configure QuickBooks Security
The first time that At Your Service tries to communicate with your QuickBooks company file, that company file must already be open within QuickBooks. QuickBooks will ask: Do you want to allow access to this company file? Click the Yes, Always button. You may also receive a second confirmation request regarding digital certificates. Again, click Yes to confirm that At Your Service may have access to the open company file.
It is recommended that you configure security options within the company file so that you do not need to have it already open every time it is accessed by At Your Service. After At Your Service has accessed the company file at least once, execute the following steps within QuickBooks to grant automatic access to the company file.
1. Open the company file in QuickBooks as a QuickBooks program administrator
2. Select Preferences from the Edit menu
3. Select the Integrated Applications icon
4. Select the Company Preferences tab
5. Uncheck the box next to Don't allow any applications to access this company file
6. Select At Your Service in the applications list
7. Click the Properties button
8. Select the Access Rights tab
9. Check the box next to Allow this application to access the company file
10. Uncheck the box next to Prompt before allowing access
11. Check the box next to Allow this application to login automatically
12. Click OK to close the Properties window
13. Click OK to close the Preferences window
Step 2: Get Default Codes from QuickBooks

From the Company File tab, click the Get Default Codes from QuickBooks button to automatically extract and assign QuickBooks codes to their At Your Service equivalents. Previously configured settings will be retained, while previously unassigned settings will automatically be assigned based on their descriptive names.
Step 3: Configure QuickBooks Options
Review the information on the various options tabs and reassign settings according to your preferences. Click the Save button to save changes. As the settings are saved, you may receive a warning that some of the assigned QuickBooks codes are currently marked as inactive within the company file. It is recommended that you activate those codes before exporting. Click the Close/Cancel button or press the Esc key to quit without saving changes.
Step 3a: Configure QuickBooks Items
QuickBooks item codes have general ledger accounts associated with them. Therefore, matching QuickBooks item codes with corresponding At Your Service equivalents allows transactions from At Your Service to automatically affect those general ledger accounts.
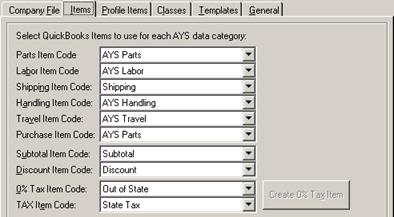
Items must already be set up within the QuickBooks company file. As the items are extracted from the company file, At Your Service will examine the descriptive names and automatically assign the closest match for each of the At Your Service categories.
|
Field |
Description |
|
Parts Item Code |
Select from a list of QuickBooks Non-inventory Part items to correspond with At Your Service parts charges. |
|
Labor Item Code |
Select from a list of QuickBooks Service items to correspond with At Your Service labour charges. |
|
Shipping Item Code |
Select from a list of QuickBooks Other Charge items to correspond with At Your Service shipping charges. |
|
Handling Item Code |
Select from a list of QuickBooks Other Charge items to correspond with At Your Service handling charges. |
|
Travel Item Code |
Select from a list of QuickBooks Other Charge items to correspond with At Your Service travel charges. The travel item code may only be configured in the full Repair and Repair Lite editions of At Your Service. |
|
Purchase Item Code |
Select from a list of QuickBooks Non-inventory Part items to correspond with At Your Service purchase order detail lines. The purchase item code may only be configured in the full Repair edition of At Your Service. |
|
Subtotal Item Code |
Select from a list of QuickBooks Subtotal items to correspond with At Your Service subtotals. |
|
Discount Item Code |
Select from a list of QuickBooks Discount items to correspond with At Your Service discounts. It does not matter which discount percentage is configured in the QuickBooks item because the discount rate will be overridden during the export. |
|
0% Tax Item Code |
If exporting to the U.S. edition of QuickBooks, select from a list of QuickBooks Sales Tax Item items that have a 0% tax rate. If there is no 0% Sales Tax Item already configured in the company file then click the Create 0% Tax Item button to automatically create one. Since At Your Service supports three taxes and QuickBooks invoices have only a single summary tax code at the bottom, At Your Service always exports taxes as invoice detail lines. The summary tax at the bottom is therefore always set to 0%. |
|
Tax Item Code |
If exporting to the U.S. edition of QuickBooks, then for each At Your Service tax (see Taxes), select from a list of QuickBooks Sales Tax Item items that have a non-0% tax rate. |
Step 3b: Configure QuickBooks Profile Items
QuickBooks customer & vendor profile items correspond to At Your Service payment methods (see Payment Methods) and payment terms (see Payment Terms). A corresponding QuickBooks profile item must exist for each corresponding At Your Service payment code.
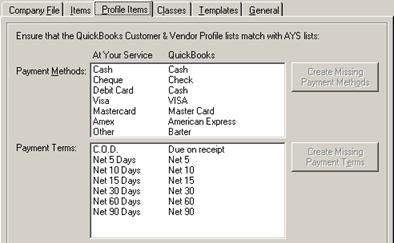
Profile items must already be set up within the QuickBooks company file. As the profile items are extracted from the company file, At Your Service will examine the descriptive names and payment settings and match them with corresponding At Your Service payment codes.
If there are any At Your Service payment methods that do not have a corresponding QuickBooks payment method then click the Create Missing Payment Methods button to automatically create them. At Your Service is unable to examine the actual payment method associated with QuickBooks payment methods, only the descriptive name. Therefore, you must ensure that payment methods are configured correctly within the company file.
If there are any At Your Service payment terms that do not have a corresponding QuickBooks terms then click the Create Missing Payment Methods Terms button to automatically create them. At Your Service only matches QuickBooks Standard terms where the net due days matches the At Your Service net due days, and the discount percentage is 0%.
Step 3c: Configure QuickBooks Classes
QuickBooks classes are optional, and allow for categorized reporting within QuickBooks.
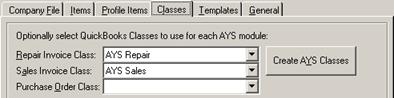
Classes must already be set up within the QuickBooks company file. As the items are extracted from the company file, At Your Service will examine the descriptive names and automatically assign the closest match for each of the At Your Service modules.
|
Field |
Description |
|
Repair Invoice Class |
Select from a list of QuickBooks classes to be assigned when exporting repair invoices, or select the blank option for no corresponding QuickBooks class. To automatically create an “AYS Repair” class in the company file, click the Create AYS Classes button. |
|
Sales Invoice Class |
Select from a list of QuickBooks classes to be assigned when exporting sales invoices, or select the blank option for no corresponding QuickBooks class. To automatically create an “AYS Sales” class in the company file, click the Create AYS Classes button. The sales invoice class may only be configured in the full Repair and Retail editions of At Your Service. |
|
Purchase Order Class |
Select from a list of QuickBooks classes to be assigned when exporting purchase orders, or select the blank option for no corresponding QuickBooks class. To automatically create an “AYS Purchase” class in the company file, click the Create AYS Classes button. The purchase order class may only be configured in the full Repair edition of At Your Service. |
Step 3d: Configure QuickBooks Templates
QuickBooks templates are optional, and allow for customized layouts of the edit screens and printed forms within QuickBooks. Templates are available only in QuickBooks 2004 and higher.
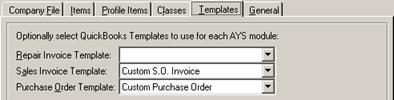
Templates must already be set up within the QuickBooks company file. As the items are extracted from the company file, At Your Service will examine the descriptive names and automatically assign the closest match for each of the At Your Service modules.
|
Field |
Description |
|
Repair Invoice Template |
Select from a list of QuickBooks invoice templates to be used when exporting repair invoices, or select the blank option for no corresponding QuickBooks template. |
|
Sales Invoice Template |
Select from a list of QuickBooks invoice templates to be used when exporting sales invoices, or select the blank option for no corresponding QuickBooks template. The sales invoice template may only be configured in the full Repair and Retail editions of At Your Service. |
|
Purchase Order Template |
Select from a list of QuickBooks purchase order templates to be used when exporting purchase orders, or select the blank option for no corresponding QuickBooks template. The purchase order template may only be configured in the full Repair edition of At Your Service. |
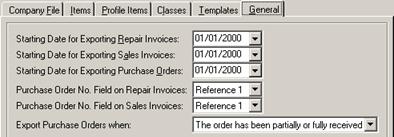
Step 3e: Configure General Options
Additional general options may be configured that affect the export of data, but do not directly correspond with QuickBooks components.
|
Field |
Description |
|
Starting Date for Exporting Repair Invoices |
Enter or select the starting date from which At Your Service repair invoices will be exported to QuickBooks. The default is today’s date. |
|
Starting Date for Exporting Sales Invoices |
Enter or select the starting date from which At Your Service sales invoices will be exported to QuickBooks. The default is today’s date. The starting date for exporting sales invoices may only be configured in the full Repair and Retail editions of At Your Service. |
|
Starting Date for Exporting Purchase Orders |
Enter or select the starting date from which At Your Service purchase orders will be exported to QuickBooks. The default is today’s date. The starting date for exporting purchase orders may only be configured in the full Repair and Retail editions of At Your Service. |
|
Purchase Order No. Field on Repair Orders |
Select whether reference field 1 or 2 on At Your Service repair orders should be inserted into the purchase order number field on QuickBooks invoices. The default is reference field 1. |
|
Purchase Order No. Field on Sales Invoices |
Select whether reference field 1 or 2 on At Your Service repair orders should be inserted into the purchase order number field on QuickBooks invoices. The default is reference field 1. The purchase order number on sales invoices may only be configured in the full Repair and Retail editions of At Your Service. |
|
Export Purchase Orders when |
Choose to export purchase orders from At Your Service as soon as the purchase order has been sent; as soon as the purchase order has been partially or fully received; or only after the purchase order has been fully received. The default is after partially or fully received. This option may only be configured in the full Repair edition of At Your Service. |
 Exporting Customer Accounts to
QuickBooks
Exporting Customer Accounts to
QuickBooks